Coral Restoration in Curacao, Part III

Completed Staghorn Outplant

If you missed our previous adventures in Curacao, check them out here:

Coral Restoration in Curacao, Part I

Coral Restoration in Curacao, Part II

Classroom Outplant Rigging:

Practice Rig

Finally, after some great food and rest, we had our last classwork session with Coral Restoration Curacao.  This time we had to take the larger “frags” and outplant them onto the reefs.  We practiced with dead coral and a demo bench.  The instructor went through the different design iterations they had used.  I found it very interesting that their latest design utilizes vertical rebar and dual-horizontal bamboo poles.  The corals are then zip-tied twice (once to each bamboo pole) for stability. Our complete work is below.

Practice Rig
Practice Rig

Coral Restoration Diving the Outplants:

Staghorn Nursery Tree

On our last dive (Part II), we were able to frag about 20 colonies and replant them on the nursery. 

As shown looking up a nursery tree, we had to choose which corals to outplant, and we had to select the largest and most healthy “chunks.” I can’t call these “frags,” as these were monstrous. 

Corals to Outplant

Each coral “chunk” was placed into a weighted milk crate for transportation to the outplant site.

Transporting Staghorn Coral

And here’s me, transporting the corals to the site. Precious goods, coming through!

Outplant Stand

Here is our own outplant site, and this combination of rebar, bamboo, and zip ties will be the new home for a small Staghorn coral reef.

Staghorn Coral Frags

This crate of Staghorn corals was my responsibility. No pressure!

Staghorn Coral Outplant

Each Staghorn chunk was double-zip-tied, once to each supporting bamboo rod. Again, this was hard (especially when I accidentally slammed my ankle into some fire coral). It was really hard for me to concentrate after that – I became a bit paranoid! Remember, gloves are not allowed here! 

Conclusion:

Staghorn Reef

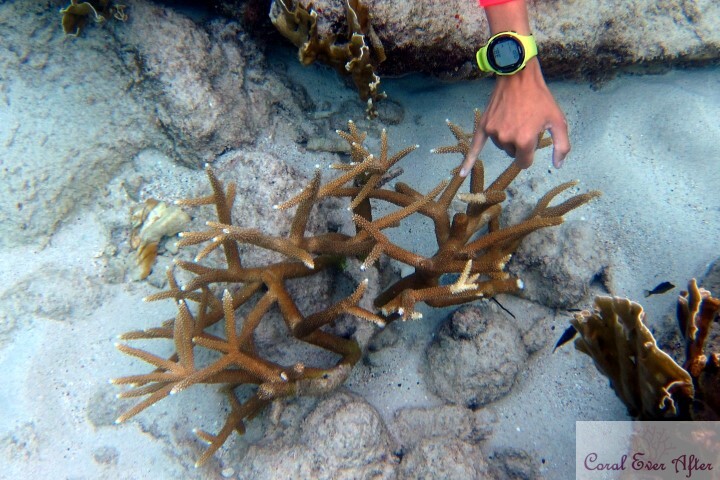
With any luck, our small little outplant will grow into a beautiful small reef soon, like the one pictured here.

Coral Reef

This Staghorn outplant helps a sand bar into a home for so much life while protecting the island.

Staghorn Reef

And maybe, the next time we return, Curacao will have a thriving Staghorn reef again, rivaling its original beauty.

Coral Restoration in Curacao, Part II

We did it

If you missed our previous adventure in Curacao, click here:

Coral Restoration in Curacao, Part I

Classroom Training on Populating Nursery Trees:

Supplies

Next up on our adventure performing coral restoration in Curacao was more classwork time during our surface interval.  On our previous dive (Part I), we cleaned the Staghorn coral nursery, and on this upcoming dive, we would get to plant small frags on the Coral Restoration Curacao nursery trees!

Coral Skeletons for Practice

First, we had to learn how to make the monofilament rigs to hold the corals and how to frag the corals.  We had to get the “frags,” secure the coral in the filament, thread the filament through the tree branch pipe, thread on a crimp (yeah, try not dropping those in the surge), and then crimp it secure.

Practice

Here, our instructor is showing us how to wrap the monofilament loop around the coral and cinch it tight. The instructor said they had better success if the corallites were slightly damaged in the process.

Coral Securing Practice

A loose loop would only allow the coral to move inside the loop in the current. This friction would continually damage the coral and permit algae to grow.

Securing Coral

Crimping the filament tight, crushing a few corallites, would cause the coral to regrow over the filament quickly, before algae could take over.

Crimping on the Tree

After our instructor secured the coral with monofilament, she threaded the filament through a hole in the nursery tree. We placed a crimp on top, ready for crimping. This was easy on our nice picnic table in the warm sun. This, in the current, felt nearly impossible.

Populating the Coral Nursery Tree:

Cutting Staghorn Frags

After our classroom work and lots of practice, we went out for our second dive. We found an “overgrown” Staghorn tree and began selecting pieces to frag.

Staghorn Coral Frags

We began collecting these Staghorn frags to replant on another nursery tree.

Staghorn Coral Nursery

Here is our newly renovated tree! This tree was originally a bit sparse, as its largest coral chunks were outplanted onto the reef. Our job was to take our small frags and hang them here. Easier said than done. Remember how we had to use those tiny crimps? Oh yeah, we definitely dropped a few and had to recover them from the silt. Once again, silly me, I thought this would be easy out on the dive.  I only managed to hang a whopping nine corals on our tree (my husband had about the same amount) in about an hour dive.  It was a lot harder than it looked. 

We did it

Here we are in front of our completed tree! It’s a great feeling, knowing that we were able to help with Coral Restoration in Curacao.

Enjoying Diving in Curacao:

Catching Fireworms

Of course, we had to catch some fireworms on the way back.

Barracuda at Cleaning Station

The barracuda greeted us on the way back again (sorry for all the silt in the photo.)  (This is a cleaning station – it’s not barring its teeth at us or anything.) What a great ending to a great dive!

Join us on Part III of our adventure!

Coral Restoration in Curacao, Part I

Coral Tree
Curacao

For our anniversary, my husband and I decided to revisit our honeymoon location:  Curacao.  It was also where we got our PADI Open Water scuba certification with Ocean Encounters and tried to catch the coral spawnings (with no luck).  So of course, this time around, we couldn’t sit still and just enjoy the island.  We had to get involved!! Coral restoration in Curacao seemed like the best way to volunteer while on vacation.

PADI Coral Restoration

My husband totally embraces my obsession with rehabilitating corals, so when he came across the PADI Coral Restoration certification offered by Coral Restoration Curacao, he signed both of us up!  Previously, my favorite dive of all time was working with Project Aware to clean up a small fishing island off the coast of Honduras, so this seemed to fit right in.

Coral Restoration Classroom Training:

PADI Coral Restoration Training

The certification class required classwork, three dives, and an exam (which wasn’t difficult… I thought I was just joking around that the first question would be “what is a coral…”  Whoops.)  

The class started off with our instructor, Vivianna, going over coral anatomy, coral pests, and the mission of Coral Restoration Foundation (CRF).  I felt so bad for the instructors because we asked a million questions and derailed all of the training!

Coral Model

The training materials included 3D-printed coral models to show their internal structure.

And, if you’re a total nerd like me, you can print off your own 3D coral model, which is downloadable for free on the National Oceanic and Atmospheric Administration’s (NOAA’s) website!

Coral Restoration Nursery and Outplant Familiarization:

Elkhorn Coral Outplants

Then, we went on our first dive.  We toured the Nursery and Outplant areas to get a feel of the area.  During our tour, our instructor pointed out the growth of various “frags” over time, pests, diseases, and other things we learned during class. Here are some Elkhorn coral outplants.

Fireworm Damage

Our instructor showed us areas of fireworm damage, along with how to use a drinking bottle as a trap.

Diseased Coral

We also visited diseased coral, so we can help identify areas of concern.

Coral Nursery

Next, we went to the Nursery.  We were assigned a tree to clean.  Our task was to use steel wool pads and scotch-brite pads to remove all the algae and fire coral from the tree.  That’s it. 

Cleaning the Coral Nursery:

Coral Tree

Ok, I really had no idea how hard that was going to be, especially with the ban on gloves.  Two people scrubbing a suspended tree, in some fairly strong surge, around critically endangered coral… and oh by the way… scrubbing fire coral just means the nematocysts get suspended in the water all around you.  That pretty much took up our entire dive… one tree cleaning… and there were LOTS of trees. 

Coral Tree Cleaning

Here, I am cleaning the coral tree, with steel wool and no gloves. Needless to say, FIRE CORAL HURTS!!!!

Clean Coral Tree

Eventually, our dive was over, and our tree was sufficiently clean for the coral to thrive. Time for a surface interval and more training!

Barracuda with Staghorn

On our way back to the beach, this lovely barracuda greeted us. What a great way to end a successful dive!

Join us on our adventure in Part II and Part III!

Scuba Diving in Blue Lake, Utah, United States

Geothermal Pool in Blue Lake, Utah

Scuba diving in Blue Lake, Utah (United States), is fun, but it’s not for everyone!  This is pretty much a lake made by divers for divers. In other words, this is probably not the best location to bring non-diving spouses, children, or friends.

Blue Lake, Utah
Blue Lake, Utah

Getting There:

Blue Lake, Utah Map

First off, this lake is out in the middle of nowhere in western Utah (circle with the arrow).  Approaching Wendover from the East will require entering Nevada (the casinos will have to wait) and doubling back into Utah. Make sure to bring everything you’ll need, including spares, as there’s nothing nearby. I’d also pack plenty of snacks and water since food is a ways away (Wendover, Utah is the closest city last I was there, underlined in the photo). (Map credit goes to Apple Maps.)

Arrival:

Did I mention there’s nothing around??

A several hundred feet walk through horseflies, sand, and snakes separates the sandy parking lot from the lake.  Thankfully, some kind souls installed a board walk across the sand and over the snakes, but that doesn’t help keep the horseflies away. 

The Lake:

Blue Lake, Utah

Back when I dove here, the “dock” was a soggy algae-covered carpet along the shore (toward the mid-left in the photo), but I’ve heard there have been some great improvements! Although this probably sounds awful to non-divers, this is a near paradise for land-locked Utah divers. 

Geothermal Pool in Blue Lake, Utah

The water is partially geo-thermally heated (see the photo with the hot springs), so it’s a bit warm.  I wore a 3-5-3 wetsuit in September and was very comfortable.

I recommend arriving as early as possible so visibility is good before newbies join the fun and stir up all the silt.  The bottom is very easy to disturb, so stay a few feet up to keep the lake nice for everyone (especially if you’re still learning proper buoyancy control).  Visibility is usually about 10-30′, but be cautious as visibility can quickly drop to zero. 

Fish by Submerged Platform in Blue Lake, Utah

There are several dive platforms for safety stops and classes (as shown in the photo, with a fish tail photobomb), a few fish, and plenty of sunken treasures.  Rope lines go from the platforms to the main attractions (sunken boat, praying mantis sculpture, turtle, etc.) Keep an eye out for road signs, a grocery cart, a shark, and other surprises…

Story Time…

So there we were (four of us), in the middle of our dive, when our visibility went to zero thanks to a class of new divers that caused a silt-out up near the dock. The four of us knew this would likely happen and had pre-communicated and decided to practice no-visibility navigation if this situation arose, rather than surfacing. We linked arms/equipment, checked our equipment the best we could, confirmed everyone was ready, released arms (maintained link via equipment), and then started trying to individually navigate back to shore.

After a few peaceful moments of sensory deprivation (I could only see brown silt and my bubbles ahead of me), I was deep in automated movement – just counting kicks and watching my equipment. Then, staring at me, within inches of my face, was another face. It was a dead, rotten, algae-covered head with unseeing eyes. I screamed. I won’t lie. I screamed.

Floating Head in Blue Lake, Utah

Once I gained composure, I realized some pranksters had tied a mannequin’s head to a string anchored to the lake’s floor. I wouldn’t have to call the police, after all.

Conclusion:

For a desert-based lake, Blue Lake, Utah is warm, unique, and is full of surprises for the avid scuba diver. If you’re looking for new places (on the cheap and local), this one isn’t bad. Go fully prepped with low expectations, and it’ll probably be a good day in the water. After the scuba diving in Blue Lake, Utah, head over to the nearest city of Wendover for some food – and clean clothes!

If you’ve seen improvements (or challenges) with the area lately, let us know in the comments! Don’t forget to check out our other scuba diving adventures as well!

error: Contact us to request digital rights.