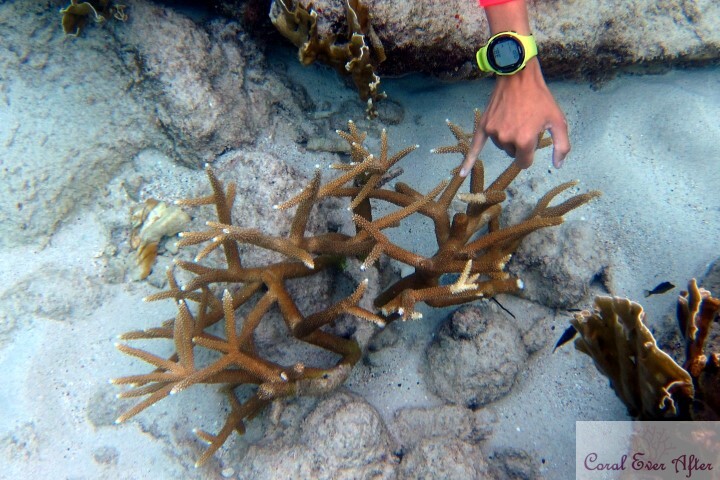
The quiet beauty of Goniopora coral’s flowery polyps swaying in an aquarium has always captivated me. Despite their notorious reputation as difficult, Goniopora coral also contrastingly flourish in other aquariums. When I spotted this remaining speck of a fragged dying Goniopora coral dwindling away at a local fish store – its skeleton exposed and polyps retracted – I knew the chances of success were low. But, the alternatives were also unacceptable.
This is the rehabilitation journey of how I brought this dying Goniopora coral back from the brink. (Photo taken on 10 May 2020)
Prepping the Quarantine Tank: Setting the Stage for Recovery
Before I even headed out the door to look for corals that I could help, I made sure my quarantine system was fully prepared and stable. This aquarium system runs independently of my grow-out and main display systems, which allows tight control over water parameters and treatment options without additional risk to or from other systems. And, it facilitates easy, daily inspections of new corals, as the tank is small and has elevated frag racks for easy viewing. Additionally, this tank has no fish (minimizes risk to my main display and reduces risk of fish irritating the new corals) or crabs (minimizes risk to the corals of nuisance or predatory picking-behaviors).
I confirmed all equipment was working as expected, and I re-installed a carbon filter on the tank (I do not typically run carbon 24/7, but I do run it during the first week or two during a recovery). Chemical parameters were within range and stable, with salinity at 35ppt, temperature hovering around 76 degrees Fahrenheit (I run my quarantine tank on the cooler side, as it seems to inhibit issue progression), alkalinity around 9 dKh, calcium around 425 ppm, and magnesium around 1350 ppm (alk/ca/mag parameters mirror my main display just for ease of transition). Since my quarantine is often filled with corals in various stages of decay or recovery – and I feed the tank a ridiculous amount – the nutrient levels are typically horrifyingly high (imagine hitting the limits on all the tests… it’s eye-popping). However, this tank also never has nuisance algae while I am rescuing coral (if I stop bringing in dying corals, algae starts to grow). It’s a fascinating observation, and I wonder if either the expellant from the dying corals inhibits the algae – or maybe the bacterial profile of the aquarium affects algal growth (the tank’s bacterial profile is vastly different from a “typical” aquarium). But, I digress.
The hardware itself on the quarantine tank is nothing impressive; it’s mostly hand-me-downs from my main display upgrades or random items I’ve won at raffles. It’s a simple 20 gallon top with a 20 gallon sump. It has a small skimmer, hang-on-back carbon filter, heaters (I always run two smaller ones to help prevent overheating), a return pump, a sump light, and an older Radion light. I do not run an extra powerhead for flow, as I try to keep the flow fairly low through the display. However, I do like to add a bubble stone during the early stages of coral recovery. This combination seems to help remove excess coral mucus gently without disturbing fragile tissue.
Only after ensuring the quarantine system was adequate for a new inhabitant did I head out on my coral adventure for the day.
Coral Assessment: First Impressions Matter
It was in the first few months of COVID when I found this dying Goniopora coral. The local fish store visited was running with minimal personnel, and I had to make an appointment to visit. The employee pointed me to a set of fresh red Goniopora frags, which were all exhibiting rapid tissue necrosis to the point that the tissue with extended polyps was only attached at a couple of points to the skeleton (I haven’t managed a recovery of this magnitude yet). This small speck of a dying Goniopora was in the same section, but a few polyps remained – retracted amongst a sea of exposed and algae-covered skeleton. Although the store did not post their water parameters, I knew they typically had excellent husbandry (but who knows how COVID restrictions affected their operations). Based on my coral triage flow chart (Slide 14 from my MACNA presentation), I considered this an “urgent” case – but not an emergency or doomed (terminal) case. There were no signs of an active infection (e.g., “Brown Jelly Syndrome”) or parasites, so my guess was that this Goniopora just might’ve needed higher nutrients (especially given that maybe the tanks weren’t fed as much as pre-COVID) – or that the water parameters were not as stable or correct as usual.
Inspections and Dipping: Clearing the Path to Recovery
Upon arrival at home, I placed the dying Goniopora coral frag (along with all the others I brought home) into my quarantine tank while still in the containers so that they could temperature acclimate. Typically, my “rescue hunting” trips are about six or more hours long. While I do try to maintain the temperature during my trip, a 15-minute acclimation also helps. I also have to prepare the inspection and dipping process anyway.
When I am ready to inspect, I take the coral out of the bag (and dispose of the water), and I set the coral in a container of quarantine tank water. I perform a visual inspection with a high-intensity white light, followed by a UV light inspection in a dark room. Comparing photos of these inspections can highlight issues, particularly certain parasites that camouflage in one spectra but not another. Again, I did not identify any macro-parasites with this Goniopora coral. Then, I walk through my coral triage flowchart again. There was tissue, fluorescence, plenty of full polyps, no gaping mouths, and no visible mesenterial filaments. So far, so good – it wasn’t a terminal case. As far as I knew, it wasn’t exposed to improper chemicals, the skeleton only had a film algae, and there was no sign of “Brown Jelly Syndrome.” Cool – not an emergent case. Although the coral was pale, it was obvious that it was naturally a pale color – not white from bleaching. There was no evidence of pests or other infections, but the tissue was clinging, and the mouths were unresponsive (not abnormal for Goniopora). So, this led me to treat the coral as an “urgent” case.
I built a catalog for my coral rescues (and am still populating it), based on a few coral disease assessment processes (e.g., NOAA’s Coral Disease Assessment Form). I assessed the dying Goniopora coral as having a small but severe tissue loss lesion with subacute/moderate progression. Although the coral’s color was white, it was not bleached. The lesion presented with an irregular pattern and diffuse distribution with an indistinct border and serpiginous margin. There was no discernible band.
This combination of signs often correlates to a water quality issue or a lack of adequate nutrients in some corals. As I am not a medical professional, this was the best I could do for a “usable diagnosis” to help provide proper care for this coral.
After the inspections, it was time for dips. I removed the coral frag from the frag plug to help prevent any nuisance algae from entering my systems, and I trimmed off all exposed coral skeleton with no remaining tissue. This task exposed more surface area for coral dips.
I prepared a hydrogen peroxide (typical grocery-store 3% stuff) and tank water dip at a 1:10 ratio in my Magnetic Stirrer Coral Dip Station, and I placed the coral in this solution for 20 seconds. This dip’s ratio and duration varies by the coral and “usable diagnosis.” Since this coral frag was so small (few crevices for pests to hide), and I did not suspect an infection, I went with a small amount of hydrogen peroxide and a short duration. Of course, I monitored the coral for the entire 20 seconds to ensure the coral did not become overly stressed. After the 20 seconds, I rinsed the coral in quarantine tank water, and then I placed in a Coral Rx dip according to the manufacturer’s instructions. Again, I rinsed the coral in quarantine tank water (out of the aquarium). Typically, I use a third dip between the hydrogen peroxide and Coral Rx to treat for any specific issues, but I did not identify a need in this case. Some studies have shown that exposure to hydrogen peroxide can inhibit calcification in corals, so I try to use the lowest amount possible to accomplish my intentions.
After the last dip, I typically superglue any exposed tissue edges with wound-grade superglue and along any exposed skeleton with regular superglue. However, this was such a tiny frag with no visible exposed tissue edges that I just superglued the frag to a plug. Before final placement into my quarantine tank, I re-checked all of my assessments and assumptions. This coral’s intake was fairly straightforward.
Quarantine: A Coral’s Safe Haven
I placed the Goniopora frag in my dedicated coral quarantine tank, which only has snails as a clean-up crew (there are no fish or crabs). Parameters closely matched my display tank (other than nitrate and phosphate), although light and flow were lower. Based on the coral’s good coloration and placement in the Local Fish Store’s system, I placed this frag on a rack higher in the tank. I was not worried about light acclimation in this case (but I highly recommend light acclimation in many cases). Flow was indirect and just enough to cause the polyps to sway gently – whenever they emerged.
Despite all the cure-all products on the market, I stick with standard tank husbandry and my own homemade foods that contain a high variety of foods and particle sizes. Each day, I inspected the coral for any issues and basted it gently with a pipette to clear off any settled detritus, and every other day, I fed the tank. It was quite a while before this Goniopora coral’s polyps emerged, and even when they did, I did not directly feed them. However, I did feed the tank upstream from the coral, which allowed the coral to catch food more naturally than a direct-feed. Also, the tank’s nitrates and phosphates were extremely high.
Eventually, the polyps emerged, and at the end of Day 30 it was time for the next phase.
Ongoing Coral Rehabilitation: The Next Phase
After 30 days in quarantine with no additional issues, I repeated the dips and fragging before moving the coral to the grow-out tank. Unfortunately a small portion of the coral did not survive, so I removed it when I re-fragged the coral. Over a year later, and the coral had made practically no progression (photo taken on 18 June 2021) (please ignore the hair algae – I needed to replenish my clean-up crew). This growth delay is not uncommon with some of the corals I rescue; their growth stagnates for a year or more. However, they usually show other signs of health and recovery, such as extended polyps and improved coloration.
Outcome: A Flourishing Flower Pot Coral
Nearly two years later, and this previously dying Goniopora coral was finally rehabilitated. After it regrew over the exposed skeleton, its growth exploded. (Photo taken on 3 January 2022)
About a month after the coral regrew over its skeleton, its polyp extension increased dramatically. (Photo taken on 21 February 2022)
Eventually, I was able to move the coral into my display aquarium, where I placed it in high flow and high light, based on observed preferences over the preceding two years. It has continued to flourish and is now the size of a golf-ball. Although growth has been slow, its humble beginnings place the growth in perspective. (Photo taken 12 March 2022)
Final Thoughts
Rehabilitating corals is not for the faint of heart, nor are Goniopora corals. But with knowledge, patience, and proper care, even delicate corals can make a comeback. A good portion of rescuing corals is just personal resiliency – not giving up on corals that haven’t yet themselves given up. While this coral may have needed almost two years to recover, the reward of seeing its polyps waving back at me each day was worth it.
Rehabilitated Goniopora Coral that was Dying – Almost Two Years Later
This is – by no means – my complete portfolio of rescued corals with before and after photos. Honestly – it’s just what this little hobbyist website could handle without bogging down too much (please let me know if the site starts acting like it’s 1995 on dial-up). In the early days, I didn’t document my rescued corals – because I didn’t think I was doing anything unusual or interesting to anyone else. So, there aren’t many photos of the early rescued corals with before and after images for comparison. I have documentation that I’ve successfully rescued over 300 corals in my home aquariums, but I don’t know where the true number really is.
Photo Composition
In showcasing this portfolio of rescued corals, I’m often asked to show the “before” corals in better lighting and in the same orientation as the “after” photos. As you can see, some of these photos go back over a decade (and a few back over 15 years). That was the age of dinosaurs, when I had to pull out an actual camera, try to remember all the manual settings, add the dates, upload and edit everything in a program, and somehow not lose the files after years of device changes… In other words, I’ve improved alongside technology. But, care of the coral during intake is my first priority (and not getting an Insta-worthy image).
Another consideration (that I have yet to solve) is… when to take the “after” photo? Should I take the “after” photo when the coral is just fully healed, or should I take the photo when the coral is at its full, mature glory? During the rehabilitation process, I try to photograph all corals monthly, and for the “after” photo, I typically use the first photo where the coral looks actually “good.” However, there are a few success stories, where I just love to show the coral as a thriving colony years later.
Photo Layout
Each photo “block” within the portfolio of rescued corals has two images: the “before” image is on the top, and the “after” image is on the bottom. Both images should have dates when the images were taken to help give a timeline between the two for comparison. On the top right of each set is just my categorizing nomenclature.
Coral Categorization
And, regarding nomenclature, I nearly gave up trying to recategorize my system after the latest round of scientific re-naming (e.g., a lot of coral in Lobophyllia were reclassified into Acanthastrea, Scolymia was reclassified as Homophyllia). I tried to categorize everything correctly here, but who knows anymore. If you see something under an old name, please just consider it a legacy item within this portfolio of rescued corals.
Gallery: Portfolio of Rescued Corals
Note: Some images have links to the full story of the coral’s recovery (this is a work in-progress; more will be added later).
Through coral restoration efforts in St. Croix, Curacao, the Florida Keys, and other areas, I’ve learned ways that marine conservation efforts can contribute substantial knowledge to our own hobbyist-level coral rehabilitation efforts. Much of what I’ve observed in my own aquariums since 2007 aligns with research efforts across the Western Atlantic and Indo-Pacific. However, there are some nuances and differences in aquarium-based coral disease assessment, especially since the coral’s location is not a useful determination factor in disease identification. This coral disease assessment information is for general purposes and is not for medical or professional advice.
Since coral diseases are typically only distinguishable at the microscopic level (which is not accessible to everyone with corals in their care), we need a way to work at the macroscopic level. Using common terminology to describe an unhealthy coral by lesion characteristics can assist in creating a “usable diagnosis,” track healing progress (or decline), and support data aggregation for further research. Below is a mixture of corals with various lesions, both from my home aquariums and from scuba diving in the Western Atlantic region.
Coral lesions are changes to the tissue of a coral, such as infections, wounds, growth anomalies, or other injuries or diseases. Click a coral with a lesion below to read more about coral disease assessments, or scroll down to browse various ways lesions can manifest.
Although there are generally three accepted types of coral tissue-related gross lesions (i.e., discoloration, loss, or growth anomaly), I’ve also included other soft tissue lesions (not sufficiently described in literature from what I can find) and skeletal anomalies (may lead to gross lesions). In the research literature, gross lesion types seem to only encompass horizontal plane changes (coloration, tissue loss) rather than vertical plane changes (soft tissue bumps, extensions), while growth anomalies tend to focus on the tissue rather than the underlying skeletal deformity. However, in my experience, there are skeletal deformations without initially identifiable tissue lesions (e.g., boring sponges). Maybe those do not belong here, but they seem to be relevant outliers that could help in our coral’s care through detailed coral disease assessments.
Tissue Discoloration (Color Change) (Bleaching and Pigmentation) Lesions:
Intact yet abnormally colored tissues are characteristics of tissue discoloration or color change lesions. Bleaching is the spectrum of a loss of color, ranging from slight fading to complete transparency (such as the following example). However, there are pigmented discolorations as well (although less common).
This coral has an extreme lesion of tissue discoloration (bleaching). Despite the nearly complete loss of pigmentation, the coral made a full recovery.
Here is a bleached Trachyphyllia coral, but it retained a fluorescent color (pigment?) I have multiple examples of this type of Trachyphyllia bleaching (but few of other species), and I have not yet figured out a sure-fire way to save them. If I had to totally guess, it appears like a self-digestive response to a stressor; the coral slowly seems to starve despite attempted interventions.
Growth anomalies are still considered lesions for descriptions of patterns, progression, and margin (but typically not of color). Genetics or environmental stressors may trigger these changes, and the specific characteristics are used for coral disease assessment.
Gall (Explained) Growth Anomaly:
Galls are skeletal deformations instigated by an inhabiting creature, such as a crab or fish.
A gall crab‘s home is circled in red (small tube toward the top of the coral). This is an example of a growth anomaly, where the coral grew around the gall crab’s tube. Although gall crabs are commonly associated with dying coral, the gall crabs are likely not a sufficiently substantial environmental stressor to be the root cause.
Here’s a little troublemaker Blenny (ok, but in all fairness, it’s pretty cute). Notice the growth anomaly, where the coral’s skeleton is growing down into the Blenny’s home.
Similarly, this maze brain type coral has a lovely structural pattern surrounding a creature’s home (I did not stick around long enough while scuba diving to determine the inhabitant). The structure is interesting to me – the coral terminates many times down at the hole. I wonder if this provides the coral some type of benefit – maybe it functions as a food distribution source (i.e., the inhabitant’s leftover’s/waste become the coral’s next meal).
Lesion Reliefs are other Growth Anomalies and include umbonate lesions (rounded growth), exophtic lesions (growing out beyond the surface), nodular lesions (small mass), and bosselated lesions (small bits that protrude). An example of exophtic lesions is below. While I do have other photographic examples of lesion reliefs, they may not be clear enough to distinguish between the other three lesion relief types.
This staghorn Acropora coral was covered in these growth anomalies. During my quick swim past while scuba diving, I was unable to discern the cause. The growths (exophtic lesions) appear like the skeleton has broken through the tissue and then become covered with cyanobacteria.
Growth Anomalies of Unknown Cause (GAN):
Growth Anomalies of Unknown Cause include various areas of accelerated growth, chaotic polyp arrangement, “gigantism,” and other as yet undetermined causes of unusual growth.
It appears some algae may have colonized prior areas of damage on this coral and created growth anomalies.
Various coral predators (e.g., flatworms, fish, sea stars, other corals), infections (e.g., viral, bacterial, fungal), mechanical interference (e.g., falling rockwork, directed water flow, sedimentation), chemical interference (e.g., high alkalinity with low nutrients), and as-yet unexplained issues may all cause tissue loss. The tissue loss lesion appearance may provide clues to the root cause, such as blenny bite marks shown previously.
Another coral stung this Fungia coral, which resulted in a tissue loss lesion. Although the damage was severe, the coral did survive (click here to learn more).
“Elegance Coral Syndrome” (ECS) is what I’d consider an outlier for gross tissue lesion types. The initial signs are external mesenterial filaments with retracted polyps and stubby tentacles. This isn’t a tissue pigmentation issue, tissue loss, or a growth anomaly (at least to my non-medically trained brain). Do we need a new category for soft tissue changes beyond simply its presence/absence and color?
Skeletal anomalies do not fall within the tissue response categories (according to some sources, but other sources include them), but it is a gross change to the coral that can result in one or more of the lesion types above, especially tissue loss or growth anomalies. I’ve included them here for completeness.
Skeletal damage from poor fragmentation, damaging rockwork (or storms, if in the ocean), fish bites, and other root causes can result in lesions. This Euphyllia coral was poorly fragged, which resulted in a tissue loss lesion and ultimately death.
On the left is a slice of a Euphyllia coral skeleton that was infested with a boring sponge, while the Euphyllia coral skeleton slice on the right was not affected. Notice the dissolved areas on the left. While this type of damage is not a tissue lesion, it may result in lesions.
Where the lesion is located on a coral can provide clues toward the coral disease assessment for a root cause. For example, certain bacteria are sediment-associated, and sediment typically aggregates along the base of the coral. As another example, some fish are corallivorous, and they eat while swimming, which means the top of the coral is typically the most damaged. Therefore, the lesion locations are broken up into basal/peripheral (base or around the perimeter), medial/central (middle/center), and apical (top). Of course, severe or extreme cases could present as combination locations.
Basal/Peripheral Lesion Location:
Basal or peripheral lesions are ones that originate at the base or outer perimeter of the coral. As pictured, this coral has a lesion that originated at its outer perimeter along the base. (I found this coral while scuba diving, and I do not know its long-term outcome.)
Medial or central lesions occur around the middle of the coral. The coral colony pictured does have a few lesions that would fall under the “apical” category, as they are along the top of the coral, but hopefully this is still a sufficient example of centrally-located lesions. (I found this coral while scuba diving, and I do not know its long-term outcome.)
Apical lesions are found at the top of the coral. The Acropora coral pictured has a few branches with lesions at the tips, caused by fireworms. (I found this coral while scuba diving, and I do not know its long-term outcome.)
There are lesions covering these coral colonies, for a combination presentation (more common in severe or extreme cases of lesion severity). The lesions are along the base, at the top, and all across the center. (I found this coral while scuba diving, and I do not know its long-term outcome.)
Documenting the lesion size is, in theory, fairly straightforward, as it is just the measurement of affected tissue. However, coral structure, obstructions, and indistinct margins can complicate the measurement. And, of course, the measurement units must be consistent in documentation (e.g., using centimeters or inches).
Simply observing the coral’s skeleton can provide a good indication of how long the lesion has existed, and, if monitored over time, how fast the lesion is progressing. White skeleton indicates recent necrosis (about a few days), while a light green skeleton may indicate necrosis of a week or more ago. Skeletons populated with multiple algal types indicate necrosis in the more distant past (possibly months or more).
Acute Lesion Duration:
The left-center of this coral shows an Acute Lesion Duration, with the white skeleton showing no algal colonization. Notice the far-left side of the coral skeleton, where there is a film algal colonization along with filamentous algal growth.
No, you aren’t seeing double (at least not unintentionally). The far-left side of the coral’s skeleton represents a Subacute Lesion Duration, where filamentous algae is beginning to colonize on the coral. This is in contrast to the left-center of the coral, where there is an Acute Lesion Duration showing the white skeleton.
Although there is a portion of an Acute Lesion Duration to the center-left of the coral shown with white skeleton, the majority of the remaining coral skeleton shown represents a Chronic Lesion Duration. There is a gradation of algal colonization, with caulerpa, bubble algae, and coralline algae growing across the coral’s skeleton.
Lesion severity is the percentage of affected coral and ranges from mild to extreme. Interestingly, I had a difficult time finding mild and moderate examples to show, as most of the corals I’ve rehabilitated fell into the severe or extreme categories. Typically, I do not attempt to salvage mild or moderately affected corals, as they tend to heal without any intervention.
Mild (<10%) Lesion Severity:
This Echinophyllia (chalice) coral had a mild lesion on one side, where the lesion size was less than 10% of the coral size. This is an example of a mild (<10%) lesion severity.
This Homophyllia (“Scolymia”) coral had a moderate lesion (let’s assume this one is 24%, although it is close to bumping up into the “severe” lesion severity category) due to a coral sting. This is an example of a moderate (10-24%) lesion severity. To learn more about this coral and its recovery, click here!
Similar to the Homophyllia coral, another coral severely stung this Trachyphyllia coral. Notice how the lesion was just shy of half of the coral. This is an example of a severe (25-49%) lesion severity. This was a severe case, but the coral made a full recovery. To learn more about this coral’s journey, click here!
This Lobophyllia coral had multiple issues, with lesions covering more than half of the colony. Despite such a bad condition, this coral recovered in only four months. This is an example of extreme (50-100%) lesion severity. Read more on this coral here!
Lesion colors are important to coral disease assessment, as they may indicate potential disease to consider (e.g., white patch disease). Lesion colors are highly interesting to me, and I haven’t found enough research to support what I’ve been seeing with my corals. I’ll add more here as I learn more.
Purple Lesion Color:
The lesions depicted are purple (and are a combination of annular/irregular with a coalescing distribution). This was the first example I had seen of purple lesions aside from Aspergillosis fungus in Gorgonian corals and may be an example of Dark Spot Disease (DSD). (I found this coral while scuba diving, and I do not know its long-term outcome.)
Although these lesions are not entirely white, white lesions are areas of bleached tissue. This coral had two large areas of bleached tissue, but it made a full recovery. To learn more about this coral’s recovery, click here!
Distinguishing a pink lesion from coralline algae may be a bit tricky, but in this case, the pink coloration is possibly originating as a defense mechanism from the coral. Despite the coral’s poor condition, it made a full recovery. Click here to learn more!
This coral has both blue and white lesions; the blue coloration is not natural, as it occurred post-bleaching during recovery. In my experience, sometimes corals with bleached lesions will heal back with blue coloration. However, these corals rarely survive long-term after the initial recovery, in my experience (my guess is that the blue coloration is from hosting a particular zooxanthallae population that is insufficient to sustain the host coral – it is almost like they become non-photosynthetic corals – or at least insufficiently photosynthetic). This is such a recurring challenge for me that I call it “Bleached-Blue-Death” given the progression from bleaching to blue coloration to death. When I have rescued corals like this, I continue spot feeding them long-term. This seems to work so far as a way to keep them alive. (I found this coral while scuba diving, and I do not know its long-term outcome.)
This Gorgonia coral has Aspergillosis, which starts with deep purple lesions that can expand and develop yellow centers.
Coral Disease Assessment – Lesion Pattern:
Lesion patterns, especially when combined with other lesion characteristics, can help provide a holistic picture for coral disease assessment. These patterns help determine if the cause may be bacterial, due to corallivore predation, or just due to poor water quality.
Annular Pattern:
This isn’t the best example of an annular lesion pattern, but it’s the best I have. An annular lesion is shaped like a ring, with healthy tissue typically on both sides of the ring. Unfortunately (and surprisingly), this coral did not recover.
An irregular shaped lesion has edges without any sort of pattern or form. The lesion edges are not smooth or straight. Although this Homophyllia had multifocal and coalescing lesions, it still survived and was one of my favorite rescues. Click here to learn how all this decay still recovered!
Linear lesion shapes are in a straight line (or straight but curving along the skeleton in rounded or massive bouldering corals). This Micromussa (Acanthastrea) coral likely had “Brown Jelly Syndrome” (the coral is pictured in a dip, with the brown jelly-like substance already removed); this damage entirely occurred overnight. Thankfully, I was able to stop the infection and salvage the coral.
Similar to the “annular” pattern, both are round-shaped. However, the “annular” shape is more of a ring-shaped lesion with a healthy center, whereas the “circular” lesion pattern is entirely the lesion.
Oblong Pattern:
The “oblong” pattern is similar to the “circular” pattern, in that the entire lesion is in an oblong shape, rather than a circle. Crazy, I know. I’m sure I have a photo for this, but I feel like it wouldn’t add anything that your imagination hasn’t already addressed.
Coral Disease Assessment – Lesion Distribution:
How the lesion presents across the coral can also provide key insights to the coral disease assessment process. If the lesion is across the entire coral, then it could be a waterborne issue; whereas, a focal lesion could indicate physical interference or corallivore predation.
Diffuse Lesion Distribution:
Diffuse lesions are spread across the coral, without a central location. This lesion presented as tissue decay across the highest points of the coral, with only tissue in the lower points surviving. Despite the coral’s terrible condition, it still fully recovered. Click here to learn more!
Focal lesions are very defined, with healthy tissue surrounding a central point. Initially, I thought something fell on the coral to cause the damage (e.g., a heater); however, I found flatworms were consuming it. Removal of the flatworms and the damaged portions resulted in the coral’s recovery.
Although this is likely a combination presentation with diffuse and coalescing lesions, it is still a good example of lesions across the coral growing and merging together – coalescing into larger lesions. Only a very small piece of this coral survived.
Linear lesion shapes and linear lesion distributions are practically synonymous. The lesion progresses in a line across the coral (even if it is a bit of a curved line). (I found this coral while scuba diving, and I do not know its long-term outcome.)
Oh, this little fellow is a troublemaker for the host coral. Notice all of the white lesions around the hole (and the hole is a growth anomaly, as well). These lesions are from fish bites, so they are multifocal (more than one location). Although multiple fish bites in a central location could form a coalescing distribution appearance, a multifocal lesion description is more appropriate given that the lesions themselves are not growing.
Personally, I tend to mix up the lesion edges/border with the lesion margin/band. The lesion edge/border is the entire length of the lesion across the coral. This length should be much longer than the lesion margin/band, which is the distance from the apparent healthy coral to the lesion or coral skeleton.
Lesion edges (or the border of the lesion) are typically considered distinct/discrete or indistinct/diffuse, as shown below, to support in coral disease assessment. There is also a category for “annular,” but given that it’s already a lesion shape, I don’t see the value in having it describe the border as well. (I also don’t have a photo for an example, so maybe I’m just already biased against it.)
Distinct or Discrete Lesion Edges/Border:
The sharp contrast between the brown tissue and the white skeleton creates a distinct lesion edge (notice how some polyps are split between half-healthy and half-skeleton). Although this Cyphastrea coral only had a small portion of healthy tissue remaining, it recovered and eventually grew to one of the largest corals in my aquarium. Click here for the before and after photos!
Contrasted with the previous Cyphastrea with distinct lesion edges, the indistinct lesion edges on this Cyphastrea create difficulty distinguishing healthy tissue and the remaining skeleton. Thankfully, this coral made a full recovery. Read more about its journey here!
Lesion margins are the lines separating healthy tissue from unhealthy tissue or the coral’s skeleton. These are also frequently called “bands.” As previously mentioned, I tend to mix up the lesion margin/band with the lesion edge/border. The lesion edge/border is the entire length of the lesion across the coral. This length should be much longer than the lesion margin/band.
Smooth Margin/Band:
As previously shown, this lesion progresses in a smooth line across the coral (even if it is a bit of a curved line). (I found this coral while scuba diving, and I do not know its long-term outcome.)
This isn’t the best example of a serrated lesion, but when I think of serrated lesions, I think of coral predation, like corallivorous starfish or Acropora-eating flatworms. This poor Acropora was dying from a bit of everything but did make a full recovery.
Similar to the serpiginous lesion margins, the undulating lesion margins wind about the coral but in a less tight manner. (I encountered this coral while scuba diving, so I do not know its outcome.)
The lesion margin/band size is the measurement of the edge tissue, which, due to the narrow shape, may be difficult to obtain. And, in indistinct or diffuse lesions, the margin/band may be impossible to discern. Once again, the measurement units must be consistent in documentation (e.g., using centimeters or inches).
Lesion margin/band colors vary and provide good indicators for coral disease assessment. In fact, several named coral diseases reference the band color in the name – it is the primary indicator of the disease. Some of these include Black Band Disease, Yellow Band Disease, Red Band Disease, and White Band. Conversely, other syndromes and diseases have no distinct colored band, such as the Caribbean white syndromes. While I wish I had my own photos of these diseases to include here for educational purposes, I’m thankful that I have not yet encountered many obvious examples.
This coral has a purple margin or band color, surrounding the lesion in the center. (I photographed this coral while scuba diving and do not know the outcome of the colony.)
This staghorn Acropora coral may have “White Band Disease.” Notice the zip tie placement near these bands toward the base of the coral. This physical indicator helps reef managers track the lesion growth and determine its growth rate. Also, there is a damselfish hiding in the top center of the photo. Damselfish nest in these corals and create algal beds. (I photographed this coral while scuba diving and do not know the outcome of the colony.)
Conclusion:
We’ve only begun to scratch the surface of coral diseases and how they may present, especially as Western Atlantic and Indo-Pacific creatures cohabitate within our aquariums. As you find new information on coral disease assessment, please reach out or share in the comments below. For additional information, please consider the following references.
References:
“Coral Disease Handbook: Guidelines for Assessment, Monitoring & Management,” Global Environment Facility, June 2008. Website
Hawthorn, Aine, et al. “An introduction to lesions and histology of Scleractinian corals.” Veterinary Pathology, vol. 60, no. 5, 31 July 2023, pp. 529–546. Website
“Lesion Terminology and Visualization.” Coral Disease & Health Consortium, 13 Nov. 2023. Website
Edited by Cheryl M. Woodley et al., Diseases of Coral | Wiley Online Books, Wiley Online Library.
When I first started keeping a saltwater aquarium, I was looking everywhere for inexpensive live rock (college debt was all-consuming). Down in the rubble bin of a local fish store, I happened across a neat semi-spherical piece. The owner asked $5 for it, which looking back was quite expensive for a 0.5lb piece of rock, but oh well. Little did I know that I would have a beautiful piece originating from a previously dying moon coral.
When I got the piece of “live rock” home, I realized it had about the most pathetic coral remaining on it. I tried to not get my hopes up, and I definitely didn’t see any beauty potential in it. When I placed the rock in the aquarium, the crabs swarmed over it like bees on honey. There apparently was a fair bit of algae on it. And, since this was 2007, there was no quarantine, no dipping, or any other good practice.
Please don’t mind the poor quality photo. This was at some point in 2007 (likely around July/August). I lost the original version somewhere along the way to 2024 (all that remains is a tiny enlarged thumbnail), my camera wasn’t the best, and admittedly, my photography skills were never great from the start.
After a few weeks, it started to extended tentacles, so I fed it. I was new to feeding corals, so it was probably just eating some pellets.
In this embarrassing photo (likely taken around December 2007), please don’t mind the bleached Alveopora and the fake colored blue ridge coral. I learned my lessons.
The coral changed very little from ~July to December 2007 (~5 months), so the change from December 2007 to April 2008 (4 months) still amazes me. During that time I upgraded from power compacts to metal halides, and my system reached over 1 year maturity. (Just look at that coralline!)
A
After one year (~July 2008), the coral was not only healthy, but it was also becoming quite beautiful! And, my reefkeeping skills were a lot less terrifyingly bad!
Note the incredible size difference between this photo (~October 2008) and the previous (~July 2008). The coral appeared to double in only about three months.
By late October 2008, there was almost no evidence the coral ever had any issues.
June 2009 (the latest photo I can find has this watermark)
I sold the coral in 2011 as it had fully outgrown my aquarium space, and we had to move across the country. If I remember correctly, the final diameter was about 8″. I never imagined my little piece of “live rock” would turn into such a beauty.
A local reefkeeper contacted me about possibly saving his dying Scolymia coral (Homophyllia australis), and the condition of it sounded quite bad. But, seeing its condition was still a shock. I wasn’t sure if there was even a mouth left since the tissue was so shrunken and discolored. But, I went ahead and did my best; its complete rehabilitation was a success! Read on for more information about this dying Homophyllia australis (Scolymia) coral’s successful rehabilitation.
Intake: Acclimation, Inspection, and Dips
When I brought the coral home (12 March 2022), I placed it (still in the container) into the sump of my quarantine tank to acclimate to the temperature for only 15 minutes. Next, I brought it over to my workbench for inspection, dipping, etc.
First, I had to assess its health. For more information on assessing a coral’s health and potential causes of damage, check out “Assessing Coral Health: An Introduction.”
Next, came the inspection and dip process. My “handy-dandy flow-chart” led me to classify this coral as an “urgent” case, which meant that it was in bad shape requiring lots of care. However, it wasn’t to the point of an emergency. This category determination was based on the algae-covered skeleton, clinging tissue, and unknown mouth situation (along with the mesenterial filaments coming out everywhere). Then came my dip process, which was fairly standard for this case. Typically I would remove excess skeleton and glue down any damaged tissue, but in this case, I absolutely had no clue what was what. Even what little tissue remained didn’t fluoresce much, so I just rolled with what I had.
Quarantine: Care and Feeding
After the dips, I placed the coral into my quarantine tank. Typically, I place these types of corals on the sand bed, but I wanted to really observe this one closely. So, I placed it up on a frag rack up near the surface of the water. This would also make feedings easier. I still wasn’t sure what was tissue and what was skeleton at this point.
In several days (18 March 2022), I was able to start to see the actual remaining tissue condition a bit better. Granted, it was pretty bad. At this point, I was in a “watch-and-see” mode. Attempts to feed could cause the coral to rot, if it is unable to properly digest the food. However, I did start target feeding corals nearby to see if I could elicit a feeding response.
In less than a month (8 April 2022), the coral was no longer retracted into the skeleton. It wasn’t pretty, but by this point, I had confidence in its survival – as long as I could get it to eat. However, I still wasn’t ready to start feeding it, as its mouth condition was unsuitable.
The coral was finally ready to start taking supplemental food by about the 1.5 month point (21 May 2022). Notice the tentacles extending and mostly-formed mouth. Success!
Conclusion: Scolymia Rehabilitation Success
Today, the previously dying Homophyllia australis (Scolymia) coral is an absolute stunner (although my photography is lacking). Notice how a lot of the grayish stripes turned green over time. This coral also features various orange shades and even yellow hues! Absolutely lovely! (Photo was taken 25 November 2023.)
With this post, CoralEverAfter expands from just coral conservation of present-day corals to appreciation of their fossil history – and maybe a glimpse into the future. I’m a nerd, through and through, right down to the rock collection I’ve had since I was a kid. However, last year, everything changed. My husband went to Australia and brought me back some opals – in the rough. He knew I had my Gryphon band saw for cutting live corals, so he thought the hard part was over (this reminds me of when I found that *free* fish tank at a yard sale that started my reefkeeping obsession). Well, I ended up with a slab saw (to cut the rough into something more workable), and then I ended up with a cabbing machine. And, of course, I couldn’t start with the opals; I had to practice! So I started buying rocks…and got addicted. But then, I found fossilized oceans. More specifically, agatized corals that were once part of an ancient reef.
So now, not only am I interested in reefkeeping and scuba diving, I’m also into coral lapidary arts. But, it doesn’t stop there. Ooooh no… Because what’s the point of having all these pretty rocks just stored up?? So, I started metalsmithing copper and silver. I already bead, so now I have pretty much the whole lifecycle of jewelry. I hope you enjoy the amazing variety of coral polyp structures, mineral colors, cyanobacteria structures, preserved deathbeds of clams, and other finds on these ancient coral reefs from fossilized oceans.
Indonesian Coral necklace, set in copper with pearl and copper accents
Indonesia Agatized Coral and Marine Life
The variety of patterns and colors in Indonesian agatized coral and other marine life is truly stunning. Some are nearly entirely agatized, leaving little traces of the original flower-patterned mineralization. Others, leave just the polyp structure, resulting in an incredible field-of-flowers pattern. But, one of my absolute favorites isn’t even a fossilized coral; it’s “Script Jasper,” which is a mortality plate of clams made of vibrant oranges, puce, and small crystal patches.
Indonesian Agatized Coral Cabochon
Indonesia Agatized Coral and Rough
Indonesian Agatized Coral Cabochon and Rough
Indonesian Agatized Coral Cabochon
Indonesia Agatized Coral Cabochon and Rough
Coquina Clam Mortality Plate Cabochon and Rough
Indonesian Agatized Coral Slab
Indonesian Agatized Coral Slab
Indonesian Agatized Coral Slab
Indonesian Agatized Coral Slab
Indonesian Agatized Coral Slab
Indonesian Agatized Coral Slab
Indonesian Agatized Coral Slab
United States Agatized Coral and Marine Life
Southwest United States:
While most Utah agatized coral comes in varying shades of browns, grays, and yellows, the Red Horn Coral (Lophophyllidium sp.) stands out, not only amongst Utah corals, but is probably at the top worldwide for its coloration, patterns, and specimen quality. Another red fossilized coral is found in Arizona. Arizona fossilized coral is a unique combination of red jasper with a soft yellowish calcite center and bits of sparkly crystal druzy. While they may not make the highest quality cabochons for jewelry, they are certainly interesting in structure and coloration. But then, there are the Michigan corals. They deserve their own paragraph.
Midwestern United States:
Probably the most infamous fossilized coral is the Michigan Petosky Stone, known for its gray body and darker gray eyes. But, there are so many more corals overshadowed by the Petosky. Take, for instance, the lowly chain coral (Halycites sp.). What a fascinating coral structure that looks like a chain necklace! Then, there are Charlevoix stones, Cladopora, and so many more! Although I don’t have examples here, other parts of the Midwest are home to lovely fossil corals.
Southern United States:
While the Petosky stone probably holds the most popular title, Florida’s Tampa Bay agatized corals are downright breathtaking. However, if you’re a coral purist, you may find yourself saddened that very few of the specimens display any remnants of the coral polyps. These agatized corals are so fully agatized that very few traces of the original structure remain. In the slideshow below, the orange piece shows miniscule traces of the original polyps along the white outer edge.
Northwestern United States
If all the fossilized corals in the United States weren’t enough, there’s other fossilized sea life, particularly Stromatolites and Oncolites, which are various microbial remnants, primarily mats and orbs of cyanobacteria. And… let’s not forget the famous Turritella agate (although it’s a freshwater snail species).
Utah Agatized Horn Coral Cabochon and Rough
Utah Horn Coral Cabochon and Rough
Arizona Agatized Coral Cabochon and Rough
Michigan Chain Coral (“Halycites”) Cabochon and Rough
Michigan Petosky Stone Cabochon and Rough
Tampa Bay, Florida Agatized Coral Cabochon
Wyoming Crinoid (Sea Lily) Cabochon and Rough
Stromatolite (Cyanobacteria Mat) Cabochon and Rough
Oncolites (Cyanobacteria orbs) Cabochon and Rough
Utah Horn Coral Slab
Michigan Cladopora Coral Slab
Michigan Petosky (Hexagonaria percarinata) Slab
Morocco Agatized Coral and Marine Life
It’s incredible to me that one of the most dazzlingly yellow pieces here is stromatolite (microbial mat, primarily cyanobacteria). The ketchup-and-mustard combination, swirled together amidst crystallized valleys, creates a stunning piece. In contrast, while the Actinocyanthus coral cabochon may not boast spectacular coloration, it compensates with exquisite detail in the polyp structure. Some specimens simply look like modern specimens filled with resin; they’re incredible.
I rarely find agatized coral from Mexico (in fact, I only have two slabs), but both are extraordinary. They feature botryoidal formations (bubbly-round structures), crystals, and agate mixed amongst the jasper in varying shades of pinks, grays, and browns.
Mexico Agatized/Crystallized Coral Cabochon
Mexican Agatized Coral Rough
Mexican Agatized and Crystallized Coral Rough
United Kingdom Agatized Coral
My only specimen from the United Kingdom is what I believe is this Lithostrotion coral. It features crystalline tubes surrounded by a dark jasper. No polyp structures are evident.
United Kingdom Lithostrotion Agatized Coral Cabochon and Rough
Unidentified Locale Agatized Coral and Marine Life
These are all unique pieces obtained from various sources, but they also came without any origin information. If you have any insights to these pieces, please let me know!
Unidentified Agatized Coral Cabochon and Rough
Invertebrate Mortality Plate Cabochon and Rough
Stromatolite (Cyanobacteria Mat) Cabochon
Unidentified Agatized Coral Cabochon and Rough
Conclusion:
Agatized corals are a great way to learn about ancient fossilized oceans and the predecessors to our current coral reefs. By studying the past, embracing the present, and planning for the future, maybe we can continue the fairytale of CoralEverAfter with a happy ending.
To Learn More:
If you would like to learn more about fossilized corals, their identification, and their structures, this website *rocks*!
I was given this dying Caulastrea “Candy Cane” or “Trumpet” coral and was told it had “brown jelly disease.” Although I had seen plenty of corals with “brown jelly”-like substances, I hadn’t had the mass contagion and mortality that some reefkeepers claimed at the time (although since then, I certainly have). I viewed this coral as a good challenge for rehabilitation. Although, without having a microscope back then, I knew I was taking a huge risk.
Note the damage and “brown jelly” on the four polyps. Image dated 14 March 2012.
First, I assessed the dying Caulastrea coral’s overall health, which was quite obvious. Of course, there was nothing I could do for the polyps on the right, so they were fragged off. The other four polyps looked awful. I dipped them in both Coral Rx and Lugols (separate dips) to check/treat for anything. I also used a pipette to gently blow off all “brown jelly” I could, without damaging the rest of the coral. Essentially, I just followed my standard inspection, dip, and quarantine protocols.
The coral would not take any food for several weeks. Instead, I resorted to just removing the “brown jelly” and maintaining water conditions, which worked in this case.
By 20 May 2012, the four remaining polyps had fully recovered. Once it started eating, the road to recovery was very quick.
I can’t say for sure that this was the typical “Brown Jelly Syndrome (BJS),” but it was still nasty. It left the coral quite ill for some time; it took another seven months to create another polyp. I do recommend extreme caution in cases like this, as BJS can cause massive die-off in the aquariums.
14 March 2012 to 20 May 2012, Caulastrea “Candy Cane” Coral
To see more amazing rehabilitations of previously dying corals, click here!
This Dipsastraea coral (previously classified as a Favia sp.) was not my first rescue coral, but it is by far one of my favorites. I picked it up in ~2008 from a local fish store’s discount $5 bin. I had no idea how to save it at the time, so it was mostly luck. I kept it in low light and medium flow. I also fed my homemade frozen food at least weekly. The colors really pop under very low light, actinic conditions.
The coral has moved with us to four different states over 14 years, so I have fragged it many times (so it is much smaller than it would have been otherwise).
1 November 200828 November 20085 April 20091 January 20107 October 201231 March 201325 May 202028 August 2021


")


 Coral Rehabilitation")


